Which Way Do Mulching Blades Go On? Guide & Install Steps
Mulching mower blades is important for keeping your lawn healthy and looking great, but it can be unclear which way to put them on. So, which way do mulching blades go? Mulching blades should have a bevel that faces towards the ground. It will ensure they can properly chop leaves and other debris into small pieces.
Our guide will walk you through the process step-by-step, making it easy to get the perfect cut every time.
Which Way Do Mulching Blades Go On?
One of the most important factors is figuring out which way to go. It may seem like a small detail, but it can make a big difference in the overall performance of your lawn mower. There are three different methods that you can use to figure out which way the mulching blades turn.
Method 1: Check Its Symbols Or Letters
They come in various shapes and sizes, but all have one thing in common: they need to be installed correctly. You can tell which way they go by checking the symbols or letters embossed on the blade. The side marked “bottom” or having a product number should be facing the ground when the lawnmower is in use.
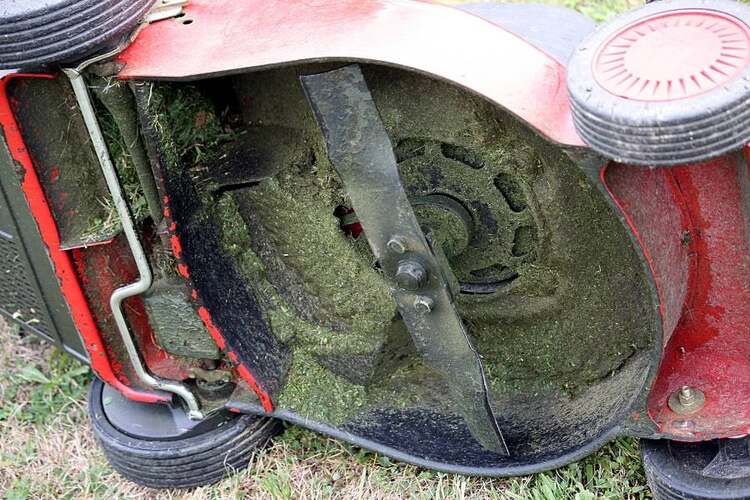
Method 2: Check Its Shape Design
There are metal flaps at its rear that are curved upward. They have a slight upward curve, and some types have less bend. When fitted, the flaps’ tips and the bend’s protrusion should face the cutting deck’s interior. It will ensure that they are working properly.
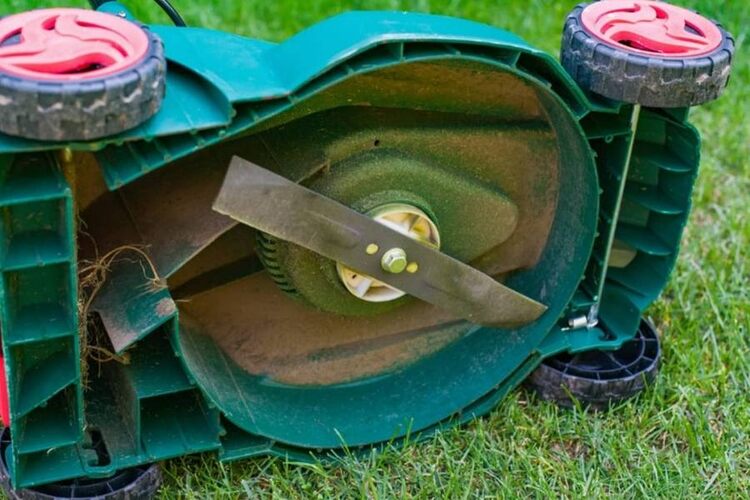
Method 3: Find Its Edge Bevel
To install it correctly on your lawnmower, you must identify its bevel. The slope is responsible for cutting and is located at its edge; it has to face the ground while the lawnmower is in the cutting position.
To find the bevel, examine the cutting edge and look for a slant or angle on this edge. Once you have found it, make sure it points downward before installing the blade on your lawnmower.
How To Know If Mower Blade Is Upside Down
There are two ways to determine if a mower blade is upside down: by rotating it or observing the cut’s results.
Method 1: Rotate It
If you’re on the right side of the mower, rotate the blade anticlockwise. If you’re mostly on the left side, rotate it clockwise. Its sharp edge should be leading. If it is, then the mower blade is in the correct position. If not, you need to turn it over.
Method 2: Observe The Results Of The Cut
If you’re paying attention when you mow the lawn, you’ll quickly see that the mower blade is turned upside down. It is because everything is contained within the cut. To get a superior cut, you should use a new or sharp knife in the right position. However, if it is done in the wrong way, it will significantly reduce the efficiency of the cut.
If you notice your grass being chopped to bits rather than a neat cut, it’s likely because the blade is oriented incorrectly. It is something you should correct right away!

How To Install A Mulching Blade
Installing a mulcher blade on your lawn mower is a great way to add nutrients back into the soil while mowing.
Not only does this help your lawn look healthier, but it can also improve the overall health of your soil over time. Here we will show you how to install it on your lawn mower in just a few simple steps.
Step 1: Prepare The Mower
Before you begin, it’s important to take some safety precautions. First, disconnect the ignition system wire from the ignition system. Then, flip the lawnmower on its side so you can reach the bottom of the cutting deck. Be sure to keep the carburetor with the air filter component on the top side to prevent oil from seeping in.
Step 2: Inspect The Mulching Blade
Now it’s time to take a look at the blade. When the mower is upright, its edge with the phrase “bottom” or a product code should face the ground. If there are no markings, you can check the bevel. When placed, the beveled section should point away from the floor. The mulching blade mower must also be bent away from the soil.
Step 3: Attach The Mulching Blade
Now it’s time to attach it to the lawn mower. Start by placing the center hole of the blade over its spindle. Then, place the washer over it, followed by the nut. Tighten the nut by hand until it is securely in place. You may need to use the accessories provided with the replacement blade.
Step 4: Secure The Blade
To prevent the blade from twisting as you adjust it, insert a small wood block between its tip and the mowing deck’s frame. Wear heavy-duty industrial gloves to protect your hands as you tighten them.
Step 5: Finish Up
To finish, use a ratchet to tighten the nut. The nut is typically 5/8-inch in size. Check that the nut is tight and the blade is not wobbly. Tighten the nut to around 70 to 90 pounds if you have a ratchet wrench. Finally, remove the wooden block and turn the mower over. Reconnect the ignition system wire, and you’re all set!
Conclusion
Mulching lawnmower blades come in different shapes and sizes, so it can be tricky to know which way mulching blades go. This comprehensive guide should help you figure out how to install it for optimal performance.
Happy gardening! I hope this guide was helpful. If you have any questions, feel free to leave a comment below.